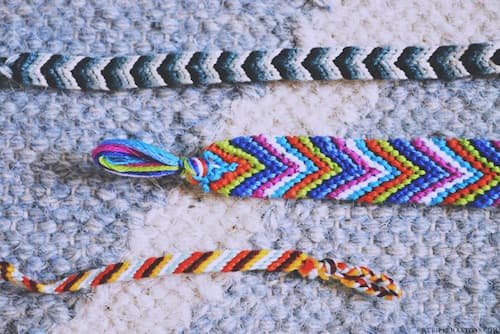
Creating your accessories is a deeply satisfying and enriching pursuit. The hands-on process allows you to infuse personal flair into each piece, making it uniquely yours. From intricate designs to simple creations, the journey of crafting becomes a source of joy and fulfillment, resulting in accessories that resonate with your individual style.
In this comprehensive guide, we will take you through the process of how to make a chevron bracelet—a stylish accessory that adds a touch of handmade charm to your collection. Whether you're a crafting enthusiast or a beginner looking for a creative project, this step-by-step guide for chevron friendship bracelet tutorial will help you create a beautiful masterpiece.

Before diving into the crafting process, it's crucial to gather all the necessary materials. For this project, you will need:
Ensure that you have high-quality materials to achieve the best results in your handmade chevron bracelet.
Creating a sturdy and well-prepared base is the foundation of crafting a beautiful chevron bracelet. Follow these essential steps to ensure your bracelet is not only visually appealing but also durable:
1. Measure and Cut the Cord: Begin by determining the desired length for your bracelet. Use a tape measure to accurately measure the cotton rope cord, keeping in mind that it's better to have a bit more than to run short.
2. Secure One End: To facilitate easy working, secure one end of the cord using a clipboard or tape. This not only provides stability but also prevents the cord from tangling as you progress.
3. Determine Color Placement: If you're using multiple colors, plan the sequence in which they will appear on your bracelet. This thoughtful arrangement contributes to the overall visual appeal of the chevron pattern.
4. Prepare Closure Mechanism: Ensure you have a suitable closure mechanism ready, such as a button or clasp, to seamlessly finish your bracelet. This step is crucial for both functionality and aesthetics.
Now that you have a strong base ready, it's time to let your creativity flow and start sculpting and knotting your chevron bracelet. This procedure will define the signature V-shaped pattern found in chevron designs and will teach you how to make a chevron bracelet using different colors. You will know how to make a chevron bracelet for beginners:
1. Prepare Embroidery Floss:
2. Arrange Strands:
3. Begin Right Knots:
4. Begin Left Knots:
5. Tie Middle Knots:
6. Continue the Pattern:
7. Finish the Bracelet:
8. Button-Loop Closure (Optional):
To make a chevron bracelet adjustable for 4 or 5 colors, follow steps 1-8, by incorporating additional strands and adapting the color combinations accordingly.
If you are looking for a handmade alternative, consider "Beaded Chevron Bracelet with Bead Chain" by TrendyFashionJewelry. This meticulously crafted accessory is a true embodiment of quality craftsmanship, offering a unique blend of style and durability.
This extra-long gold metal cuff features a stunning bead chain design, crafted from high-quality brass. With its no-clasp design, this bracelet ensures effortless wear and a seamless look.

In conclusion, creating a Chevron bracelet involves a delightful blend of preparation, skill, and creativity. From gathering the right materials to meticulously preparing your bracelet base and mastering the art of knotting to achieve the iconic Chevron pattern, each step is crucial for crafting a beautiful piece. For those seeking a unique twist or perhaps a shortcut without compromising on the handmade charm, the Dowling Brothers Bracelet offers an exquisite handmade alternative. Whether you choose to embark on the DIY journey or opt for a ready-made piece, the Chevron bracelet stands as a testament to the timeless appeal of personalized, handcrafted jewelry.
The number of strings depends on the width of your desired bracelet. Generally, a standard chevron bracelet requires at least 8 strings, but you can adjust this based on your design preferences.
The length of your Chevron bracelet should generally match your wrist size plus an extra half inch to an inch for comfort and closure. Measure your wrist and add this extra length to determine the total length, ensuring a snug yet comfortable fit that's easy to wear and remove.
Absolutely! Experimenting with different color combinations is part of the fun. Adjust the sequence of your colors to create a unique and eye-catching Chevron pattern.
Learn how to open PANDORA bracelet using simple but effective techniques. Discover ways to open different types of claps in PANDORA bracelets.
Read MoreWanna learn how to make an adjustable bracelet using inexpensive materials? We’ll teach you how to make one that you can wear or give as a present.
Read MoreLearn how to make a paracord bracelet with our ultimate guide, covering tools, measuring, setup, weaving patterns, and finishing techniques for your DIY accessory.
Read MoreLearn how to make a bra strap bracelet with our easy guide, covering materials, steps, customization, best replacements, and maintenance tips.
Read More